The Russian Navy’s submarine fleet is undergoing significant modernization, with advanced vessels like the Yasen-Class showcasing stealth capabilities rivaling Western counterparts, enhancing strategic deterrence and operational versatility.
Overview of the Russian Navy Submarine Fleet
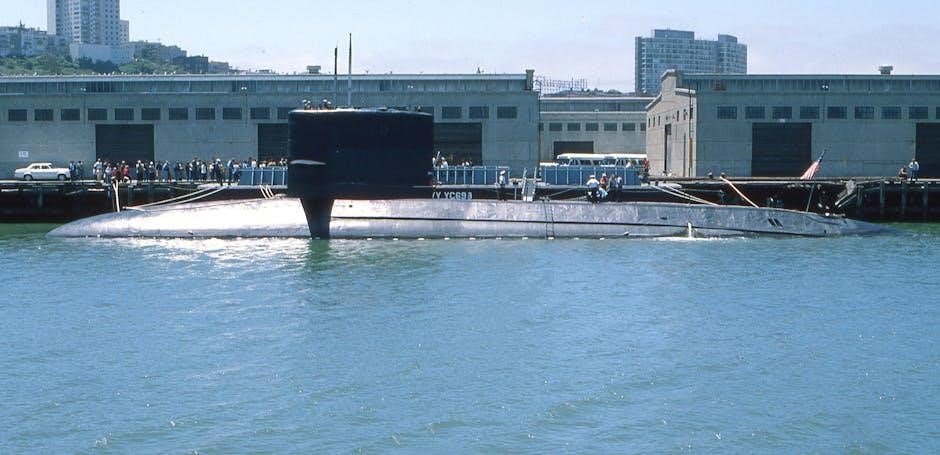
The Russian Navy’s submarine fleet has significantly reduced since the Soviet era, now operating around 56 submarines, emphasizing modernization and strategic nuclear deterrence capabilities to ensure national security.
1.1. Historical Development of Russian Submarines
The Russian submarine fleet traces its roots to the Soviet era, when it was a dominant force with over 240 vessels. From 1956 to 1970, the USSR commissioned 290 submarines, establishing a robust naval presence. Post-Soviet economic challenges led to a significant reduction in fleet size, with only 56 submarines in service today. Historical milestones include the introduction of nuclear-powered submarines in the 1950s and advanced classes like Akula and Oscar-II. Recent developments, such as the deployment of mini-submarines for special operations, highlight Russia’s ongoing commitment to submarine innovation and strategic maritime capabilities.
1.2. Current Submarine Fleet Composition
The Russian Navy operates a mixed fleet of nuclear and conventional submarines, with approximately 56 vessels, down from the Soviet-era peak of 240. Key classes include the Yasen-Class, Akula-Class, Oscar-II-Class, Borei-Class, and Kilo-Class submarines. These vessels serve various roles, from strategic deterrence with ballistic missile submarines (SSBNs) to multi-role attack submarines (SSNs); The fleet also includes special purpose submarines and mini-submarines for covert operations. Modernization efforts have introduced advanced stealth technology and improved weaponry, ensuring the fleet remains capable despite its reduced size, with ongoing deployments in regions like the Black Sea and Pacific Fleet.
1.3. Strategic Importance of Submarines in the Russian Navy
Russian submarines play a critical role in strategic deterrence, providing the capability to launch nuclear ballistic missiles and conduct covert operations. They are central to Russia’s naval power, ensuring a second-strike capability and reinforcing national security. Submarines also enable the Russian Navy to project power globally, supporting anti-submarine warfare and special operations. Their strategic importance is underscored by recent deployments in the Black Sea and Pacific Fleet exercises, demonstrating their versatility in safeguarding Russian interests and maintaining regional influence. Modernized fleets, such as the Yasen-Class, highlight their enduring relevance in Russia’s military strategy.
Classes and Types of Russian Navy Submarines
Russia operates a diverse fleet of submarines, including Yasen-Class, Akula-Class, Oscar-II-Class, Borei-Class, and Kilo-Class, each designed for specific roles like multirole missions, nuclear deterrence, and anti-submarine warfare.
2.1. Yasen-Class Submarines
The Yasen-Class submarines represent the pinnacle of Russian submarine technology, featuring advanced stealth capabilities and multirole functionality. Equipped with supersonic cruise missiles and torpedoes, these submarines are designed to engage both surface and underwater targets. Their quiet propulsion systems make them highly effective in strategic operations. The Yasen-Class is a key component of Russia’s naval modernization, enhancing the country’s ability to project power on the global stage while maintaining a strong deterrent presence.
2.2. Akula-Class Submarines
The Akula-Class submarines are a cornerstone of the Russian Navy, serving as multirole nuclear-powered attack submarines. Known for their advanced sonar systems and weapon payloads, these submarines are capable of engaging surface ships, submarines, and land targets. Deployed primarily in the Northern and Pacific Fleets, the Akula-Class plays a critical role in Russia’s maritime strategy, ensuring its presence in strategic regions. Their operational versatility and reliability make them a key asset in maintaining naval dominance and deterrence capabilities.
2.3. Oscar-II-Class Submarines
The Oscar-II-Class submarines are a series of Russian Navy anti-ship submarines equipped with P-700 Granit missiles. Introduced in the 1980s, these submarines were designed to counter NATO carrier strike groups. With a length of over 500 feet, they are among the largest attack submarines in the world. Equipped with advanced sensors and weapon systems, Oscar-II-Class submarines remain operational, with some undergoing modernization to maintain their effectiveness. Their speed, endurance, and firepower make them a formidable component of Russia’s naval capabilities, ensuring their continued relevance in modern maritime operations.
2.4. Borei-Class Submarines
The Borei-Class submarines represent Russia’s latest generation of strategic nuclear-powered ballistic missile submarines. Designed to replace the aging Delta-III and Typhoon-Class submarines, the Borei-Class serves as the backbone of Russia’s naval nuclear deterrent. These submarines are armed with up to 16 Bulava intercontinental ballistic missiles, providing a robust second-strike capability. The Borei-Class features advanced stealth technology, enhanced maneuverability, and improved survivability, ensuring their effectiveness in strategic deterrence. With a focus on reliability and operational readiness, these submarines are critical to maintaining Russia’s nuclear triad and global naval influence.
2.5. Kilo-Class Submarines
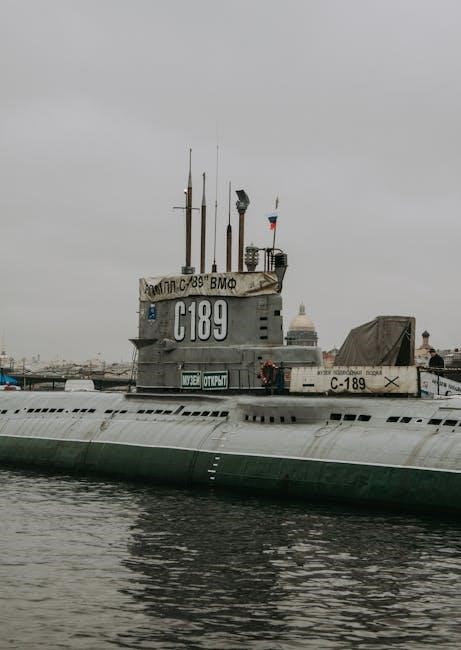
The Kilo-Class submarines are advanced diesel-electric attack submarines widely used by the Russian Navy for anti-submarine and anti-surface warfare. Known for their exceptional stealth and endurance, these submarines are equipped with torpedoes, mines, and anti-ship missiles. Improved Kilo-Class variants feature enhanced acoustic quieting and weapon systems, making them highly effective in littoral and deep-water operations. Deployed across various fleets, including the Black Sea, they play a critical role in Russia’s naval strategy. Despite their age, ongoing modernization efforts ensure their relevance in contemporary naval warfare, solidifying their importance in the Russian Navy’s operational capabilities.
Modernization and Upgrades
Russia’s submarine modernization focuses on enhancing stealth, propulsion, and weaponry, aiming to counter Western advancements and maintain strategic dominance, with significant funding allocated for technological improvements.
3.1. Modernization Initiative Overview
The Russian Navy’s submarine modernization initiative aims to enhance its strategic capabilities by replacing aging Soviet-era vessels with advanced submarines. This effort focuses on improving stealth, propulsion systems, and weaponry to maintain strategic relevance. Key projects include the Yasen-Class and Borei-Class submarines, which feature quiet propulsion and advanced missile systems. Economic challenges have slowed progress, but recent funding increases have revitalized the program. The initiative also addresses maintenance and technological gaps, ensuring the fleet remains competitive. These upgrades are critical for Russia to project power and deter threats, aligning with its broader naval strategy for global influence.
3.2. Stealth Technology Advancements
Russia’s submarine modernization emphasizes stealth technology to counter adversaries’ detection capabilities. The Yasen-Class submarines feature anechoic coatings and streamlined hull designs to reduce acoustic signatures, enhancing their ability to operate undetected. Additionally, advanced propeller designs and noise-reducing materials minimize vibrations, making these vessels among the quietest in the world. These advancements enable Russian submarines to evade detection, improving their strategic effectiveness in both offensive and defensive roles. Such technological improvements are crucial for maintaining Russia’s naval competitiveness and ensuring its submarines remain viable deterrents in modern underwater warfare scenarios.
3.3. Nuclear Submarine Propulsion Systems
Russia’s nuclear-powered submarines utilize cutting-edge propulsion systems, enhancing endurance and operational range. Advanced reactors provide greater energy efficiency and quieter operation, reducing detection risks. These systems enable submarines to stay submerged longer, conduct longer missions, and maintain strategic readiness. Modernized designs emphasize safety and reliability, addressing past concerns. The improved propulsion systems are integral to Russia’s efforts to maintain a robust nuclear deterrent and ensure its submarines remain competitive in global naval operations, despite economic and technological challenges.
3.4. Missile and Weaponry Upgrades
Russian submarines are equipped with advanced missile and weaponry systems, significantly boosting their combat capabilities. The Yasen-Class submarines now carry the Kalibr-NK cruise missiles, capable of precision strikes against land and sea targets. Additionally, the modernized Akula-Class submarines feature enhanced torpedo systems and anti-submarine warfare capabilities. The integration of hypersonic missiles, such as the Tsircon, is expected to further increase their lethality. These upgrades ensure Russian submarines remain formidable in both offensive and defensive roles, maintaining their strategic relevance in global naval operations and enhancing Russia’s naval deterrence capabilities.
Strategic Deterrence and Operational Roles
Russian submarines play a critical role in strategic deterrence, deploying ballistic missiles and conducting anti-submarine warfare. Their versatile capabilities ensure naval dominance and national security interests globally.
4.1. Ballistic Missile Submarines (SSBNs)
Russian SSBNs, such as the Borei-Class, form the backbone of the navy’s nuclear deterrent. Equipped with intercontinental ballistic missiles like the Bulava, these submarines ensure strategic stability. Their ability to remain undetected and launch missiles from remote locations makes them a critical component of Russia’s nuclear triad. Regular patrols and modernization efforts ensure their readiness, underscoring their role in maintaining global strategic balance. The SSBN fleet remains central to Russia’s national security, providing a reliable second-strike capability and reinforcing its position as a nuclear power.
4.2. Attack Submarines (SSNs)
Russian attack submarines, such as the Yasen- and Akula-Class, are designed for multi-role operations, including anti-submarine and anti-surface warfare. These SSNs are equipped with advanced torpedoes, missiles, and sensors, enabling them to dominate underwater and surface environments. Their stealth technology and maneuverability make them formidable assets for intelligence gathering and special operations. The Yasen-Class, in particular, represents a leap in Russian SSN capabilities, combining versatility with state-of-the-art weaponry. These submarines play a critical role in protecting Russian naval assets and projecting power, ensuring their strategic relevance in both regional and global contexts.
4.3. Special Purpose Submarines
Russia operates a range of special purpose submarines designed for unique missions beyond traditional roles. These include deep-diving submersibles like the Losharik and Paltus, used for underwater research, rescue operations, and intelligence gathering. Some are capable of conducting clandestine missions, such as deploying mini-submarines for sabotage or reconnaissance. These specialized vessels highlight Russia’s ability to adapt submarines for unconventional tasks, enhancing their versatility in strategic operations and maintaining their relevance in modern naval warfare.
4.4. Anti-Submarine Warfare (ASW) Capabilities
Russia’s Anti-Submarine Warfare (ASW) capabilities are integral to its naval strategy, focusing on detecting, tracking, and engaging enemy submarines. The Russian Navy employs a combination of surface ships, aircraft, and submarines to maintain ASW readiness. Key assets include the Il-38 and Tu-142 aircraft for airborne surveillance, while surface ships like the Admiral Gorshkov-class frigates are equipped with advanced sonar and anti-submarine missiles. Additionally, Russian submarines, such as the Akula-class, play a dual role in both attack and ASW missions. These capabilities are critical for safeguarding Russia’s maritime borders and countering potential threats in strategic regions.
Recent Deployments and Activities
Russian submarines have been actively deployed in the Black Sea, Sea of Japan, and near Nord Stream pipelines, conducting missile launches, drills, and strategic patrols to assert presence.
5.1. Submarine Deployments in the Black Sea
Russian submarines, including Improved Kilo-class vessels, have been deployed in the Black Sea, conducting patrols and strategic missions. These deployments underscore Russia’s assertive posture in the region, enhancing its naval presence and capability to project power. The submarines are equipped with advanced weaponry, enabling them to perform a variety of tasks, from reconnaissance to combat operations. These activities reflect Russia’s ongoing efforts to maintain influence in the Black Sea and ensure maritime security in strategic areas.
5.2. Pacific Fleet Drills and Missile Launches
The Russian Navy’s Pacific Fleet has conducted extensive drills in the Sea of Japan, showcasing its operational readiness. Submarines, including the Ufa-class, have launched cruise missiles during these exercises, demonstrating their strategic capabilities. These drills highlight the fleet’s ability to project power and maintain maritime security in the Asia-Pacific region. The operations also underscore Russia’s commitment to modernizing its submarine forces, ensuring they remain a formidable component of its naval strategy. Such activities reinforce the Pacific Fleet’s role in safeguarding Russian interests and deterring potential threats in the region.
5.3. Submarine Activity in the Sea of Japan
Russian submarine activity in the Sea of Japan has increased, with reports of missile launches during Pacific Fleet drills. The Ufa-class submarine, noted for its stealth capabilities, participated in these exercises, demonstrating operational readiness. Such activities highlight the Russian Navy’s ability to project power in the region and maintain a strategic presence. These operations are part of broader efforts to ensure maritime security and deter potential threats, showcasing the Pacific Fleet’s role in advancing Russian naval interests in the Asia-Pacific area.
5.4. Mini-Submarine Operations at Nord Stream Pipelines
The Russian Navy is believed to have operated mini-submarines near the Nord Stream pipelines days before the 2022 explosions, according to German reports. These operations likely involved espionage, sabotage, or environmental monitoring. While Russia denies involvement, the incident underscores the navy’s capabilities in underwater operations. The use of mini-submarines highlights their versatility in strategic missions, raising concerns about their potential role in future conflicts or infrastructure disruptions. This activity has sparked international scrutiny, emphasizing the significance of submarine operations in modern naval strategy and geopolitical tensions.
Challenges and Limitations
Economic constraints, aging submarines, and technological gaps hinder the Russian Navy’s modernization efforts, while international sanctions further complicate maintenance and fleet expansion initiatives.
6.1. Economic Constraints and Funding Issues
Economic challenges have significantly impacted the Russian Navy’s submarine modernization efforts. Reduced funding due to financial difficulties and sanctions has delayed critical shipbuilding programs. The high cost of advanced submarines, such as the Yasen-Class, strains budgets, limiting the number of vessels that can be built. Additionally, economic sanctions have disrupted supply chains, affecting the import of essential components. These financial constraints have forced the navy to prioritize projects, leading to delays in delivering new submarines, such as the Lada-Class, which faced setbacks due to funding issues. Such economic limitations hinder the fleet’s ability to expand and modernize effectively.
6.2. Aging Submarine Fleet and Decommissioning
The Russian Navy faces challenges with an aging submarine fleet, as many vessels are nearing or exceeding their operational lifespans. Decommissioning rates have accelerated, particularly for older Soviet-era submarines, reducing the fleet’s size significantly. The navy operates approximately 56 submarines today, down from 240 in the late Soviet era. Maintenance and upkeep of aging vessels strain resources, while newer submarines, like the Improved Kilo-Class, continue to serve despite operational demands. This aging fleet raises concerns about readiness and capabilities, as modernization efforts struggle to keep pace with decommissioning rates.
6.3. Technological Gaps and Maintenance Challenges
Russia’s submarine fleet faces technological gaps, particularly in air-independent propulsion and advanced stealth systems, lagging behind Western navies. Maintenance challenges are exacerbated by limited funding, impacting the upkeep of aging vessels. The Lada-Class, for instance, has faced delays due to technical issues, highlighting struggles in modernizing capabilities. These shortcomings affect operational readiness and the navy’s ability to maintain a competitive edge, despite efforts to prioritize smaller, multirole designs. Such challenges underscore the need for sustained investment to address growing maintenance backlogs and bridge technological disparities.
6.4. International Sanctions and Their Impact
International sanctions have significantly impacted Russia’s submarine modernization efforts, restricting access to advanced technologies and components; These measures have disrupted supply chains, delaying projects like the Yasen-Class and Borei-Class submarines. Financial constraints due to sanctions have also limited the navy’s ability to replace aging vessels, further straining operational capabilities. Additionally, sanctions have hindered collaboration with foreign shipyards and technology providers, slowing the development of next-generation submarines. These challenges underscore the long-term effects of sanctions on Russia’s naval ambitions and its ability to maintain a technologically competitive submarine fleet.
Future Prospects and Developments
Russia is advancing its submarine fleet with next-generation designs, focusing on unmanned systems and improved stealth. Initiatives like the Poseidon unmanned underwater system highlight future strategic capabilities.
7.1. Upcoming Submarine Projects and Deliveries
Russia’s submarine fleet is set to expand with advanced vessels. The Yasen-Class submarines, built at Sevmash Shipyard, are expected to see continued deliveries through the late 2020s. Additionally, the Borei-Class strategic submarines, including the improved Borei-A variant, are undergoing trials and will bolster the navy’s nuclear deterrent; The Lada-Class diesel-electric submarines are also anticipated to join the fleet, enhancing Russia’s conventional submarine capabilities. Special-purpose submarines, such as the Belgorod and Khabarovsk, are nearing operational readiness, offering unique strategic roles. These projects underscore Russia’s commitment to modernizing its submarine fleet for future naval dominance.
7.2. Advancements in Autonomous Underwater Vehicles (AUVs)
Russia is actively developing Autonomous Underwater Vehicles (AUVs) to enhance its submarine fleet’s capabilities. These unmanned systems are designed for reconnaissance, mine countermeasures, and environmental monitoring. The Klavesin-2M AUV, for instance, has been deployed for deep-water operations, showcasing improved navigation and endurance. Additionally, the development of the Nemo and Bester AUVs highlights Russia’s focus on advancing underwater robotics. These systems complement traditional submarines, enabling real-time data collection and expanding operational flexibility in strategic and special missions, ensuring the Russian Navy remains competitive in underwater warfare and exploration.
7.3. Integration of Unmanned Underwater Systems
The Russian Navy is integrating unmanned underwater systems to enhance its submarine operations. These systems, including AUVs like the Klavesin-2M, enable real-time data collection for reconnaissance, mine countermeasures, and environmental monitoring. By integrating AUVs with manned submarines, Russia aims to improve situational awareness and operational flexibility. This synergy allows for more precise targeting and reduced risk to crewed vessels. The incorporation of unmanned systems also supports special missions, such as covert operations and deep-sea exploration, modernizing the fleet’s capabilities and ensuring it remains competitive in maritime warfare and strategic deterrence.
7.4. Strategic Plans for Submarine Fleet Expansion
Russia plans to expand its submarine fleet with advanced capabilities, focusing on nuclear-powered and stealth technologies. The Yasen-Class and Borei-Class submarines are central to these plans, aimed at replacing aging Soviet-era vessels; The navy seeks to enhance strategic deterrence and improve its ability to operate in multi-domain conflicts. New submarine projects, including next-generation designs, are prioritized to ensure technological parity with global competitors. Despite economic challenges, funding allocated under GPV 2020 has supported these initiatives, ensuring the Russian Navy maintains a formidable underwater presence and capability to project power in key maritime regions.
Comparative Analysis with Global Submarine Forces
Russia’s submarine fleet is increasingly comparable to Western navies, with the Yasen-Class rivaling US submarines in stealth and technology, bolstering its global strategic deterrence capabilities.
8.1. Comparison with US Navy Submarines
The Russian Navy’s Yasen-Class submarines are increasingly comparable to US Fast Attack Submarines, with advanced stealth capabilities and propulsion systems. While the US maintains numerical superiority, Russia’s focus on modernizing its fleet with technologically advanced submarines has narrowed the gap. The Yasen-Class, in particular, rivals US submarines in terms of quiet operations and firepower, making it a formidable asset. However, the US Navy’s broader operational experience and global deployment capabilities remain unmatched. This comparison highlights Russia’s efforts to challenge US dominance in underwater warfare through strategic modernization and technological advancements.
8.2. Russian Submarines vs. NATO ASW Capabilities
Russian submarines, particularly the Yasen-Class, pose a significant challenge to NATO’s anti-submarine warfare (ASW) capabilities due to their advanced stealth technology and quiet propulsion systems. While NATO has invested in improving its ASW technologies, the decline in related capabilities since the Cold War has left gaps in detecting and neutralizing modern Russian submarines. The resurgence of Russian underwater activity has prompted NATO to strengthen its ASW strategies, emphasizing international cooperation and advanced sensor systems. This evolving dynamic underscores the strategic importance of underwater warfare in shaping global naval security and deterrence capabilities.
8.3; Technological Parity and Modernization Efforts
Russia’s submarine modernization efforts have narrowed the technological gap with Western navies, particularly in stealth and propulsion systems. The Yasen-Class submarines now rival U.S. Fast Attack Submarines in quietness and lethality. Investments in advanced sonar, missile systems, and autonomous capabilities highlight Russia’s focus on achieving technological parity. However, economic constraints and maintenance challenges remain significant hurdles. Despite these limitations, Russia’s commitment to modernizing its submarine fleet underscores its determination to maintain a competitive edge in underwater warfare, ensuring its naval forces remain a formidable presence on the global stage.
Russia’s submarine fleet remains a critical component of its naval strategy, with modernization efforts enhancing its strategic deterrence capabilities and implications for global naval security dynamics.
9.1. Summary of Key Findings
The Russian Navy’s submarine fleet has undergone significant modernization, with advancements in stealth technology and missile systems enhancing its strategic deterrence capabilities. Despite economic challenges, the fleet remains a critical component of Russia’s naval power, with submarines like the Yasen-Class demonstrating parity with Western counterparts. Recent deployments in strategic regions highlight their operational versatility, while ongoing projects signal future expansion. However, aging vessels and maintenance issues pose challenges, underscoring the need for sustained investment to maintain its role as a near-peer competitor in global naval security.
9.2. Implications for Global Naval Security
The modernization of Russia’s submarine fleet poses significant implications for global naval security, as advanced vessels enhance Moscow’s ability to project power and deter adversaries. The Yasen-Class submarines, with their stealth capabilities, challenge NATO’s anti-submarine warfare effectiveness, potentially disrupting the balance in strategic waterways. Increased deployments in critical regions like the Black Sea and Pacific underscore Russia’s intent to expand its influence. These developments necessitate enhanced vigilance and cooperation among NATO allies to counter emerging threats and maintain maritime stability in key operational theaters.
9.3. Future Outlook for Russian Submarine Fleet
Russia’s submarine fleet is expected to continue its modernization trajectory, with a focus on stealth technology and strategic capabilities. Upcoming projects, including new Yasen-Class deliveries, aim to bolster the navy’s nuclear deterrent and operational versatility. Integration of autonomous systems and advanced weaponry will likely enhance their effectiveness. However, economic constraints and aging vessels remain challenges. Despite these hurdles, Russia’s submarine modernization efforts suggest a commitment to maintaining its role as a key naval power, ensuring continued relevance in global maritime security dynamics.