Experience the rich history and vibrant culture of Old San Juan with a self-guided walking tour using a detailed PDF map․ This guide offers a perfect blend of historical sites, scenic views, and cultural landmarks, allowing visitors to explore at their own pace․ From iconic fortresses like Castillo San Felipe del Morro to charming streets and plazas, the map provides a comprehensive route to discover the best of Old San Juan․
Overview of Old San Juan
Old San Juan is a historic district in Puerto Rico, known for its well-preserved colonial architecture, cobblestone streets, and rich cultural heritage․ This 7-square-block area is surrounded by ancient walls and features iconic landmarks like fortresses, museums, and picturesque plazas․ The district is a UNESCO World Heritage Site, attracting visitors worldwide with its vibrant history and charm․ Walking through Old San Juan feels like stepping back in time, with its colorful buildings, scenic coastal views, and lively atmosphere․ The area is perfect for exploring on foot, making it an ideal destination for a self-guided walking tour․ Its compact size and interconnected streets ensure an immersive and convenient experience․
Importance of a Walking Tour
A walking tour is the ideal way to experience Old San Juan’s charm and history․ It allows visitors to immerse themselves in the city’s vibrant culture, admire its colonial architecture, and explore hidden gems at their own pace․ Walking provides a more intimate connection to the area, enabling a deeper appreciation of its historical significance․ A self-guided tour with a PDF map offers flexibility, ensuring visitors can prioritize attractions and navigate effortlessly․ This approach is cost-effective, eco-friendly, and allows for meaningful interactions with local landmarks and communities․ By walking, visitors can truly soak in the beauty and history of this UNESCO World Heritage Site․
Benefits of Using a PDF Map
A PDF map is an essential tool for navigating Old San Juan, offering a comprehensive guide to the city’s attractions, historical sites, and practical details․ It provides a clear, printable layout that can be accessed offline, ensuring uninterrupted navigation․ The map highlights must-see landmarks, restaurants, and hotels, making it easy to plan your itinerary․ Its portability allows visitors to carry it on mobile devices or print it for convenience․ By using a PDF map, travelers can efficiently explore the area, saving time and ensuring they don’t miss any key sights․ It’s a valuable resource for both first-time visitors and seasoned travelers, enhancing the overall experience of Old San Juan․
Key Attractions in Old San Juan
Explore Old San Juan’s iconic landmarks, including Castillo del Morro, Paseo de la Princesa, and the San Juan Cathedral, showcasing rich history and cultural treasures․
Castillo San Felipe del Morro
Castillo San Felipe del Morro, a 16th-century fortress, stands as a testament to Old San Juan’s strategic importance․ Part of the San Juan National Historic Site, it offers breathtaking views of the Atlantic Ocean and the city․ The fort’s robust architecture, with its towering walls and intricate tunnels, reflects its historical role in defending the island․ Visitors can explore its barracks, bastions, and museum to uncover its military and cultural legacy․ Featured prominently on the PDF map, El Morro is a must-visit attraction, blending history, architecture, and natural beauty, making it a highlight of any walking tour․
Paseo de la Princesa
Paseo de la Princesa is a picturesque promenade in Old San Juan, perfect for a leisurely stroll․ Lined with shade trees, street performers, and local vendors, it offers a vibrant atmosphere․ The promenade begins at the San Juan Gate and extends along the bay, providing stunning views of the water and the city walls․ According to the PDF map, it’s a key starting point for exploring the historic district․ Visitors can enjoy local cuisine, shop for souvenirs, or simply relax and soak in the charm of this iconic pathway, making it a delightful addition to any walking tour of Old San Juan․
San Juan Cathedral (Catedral de San Juan)
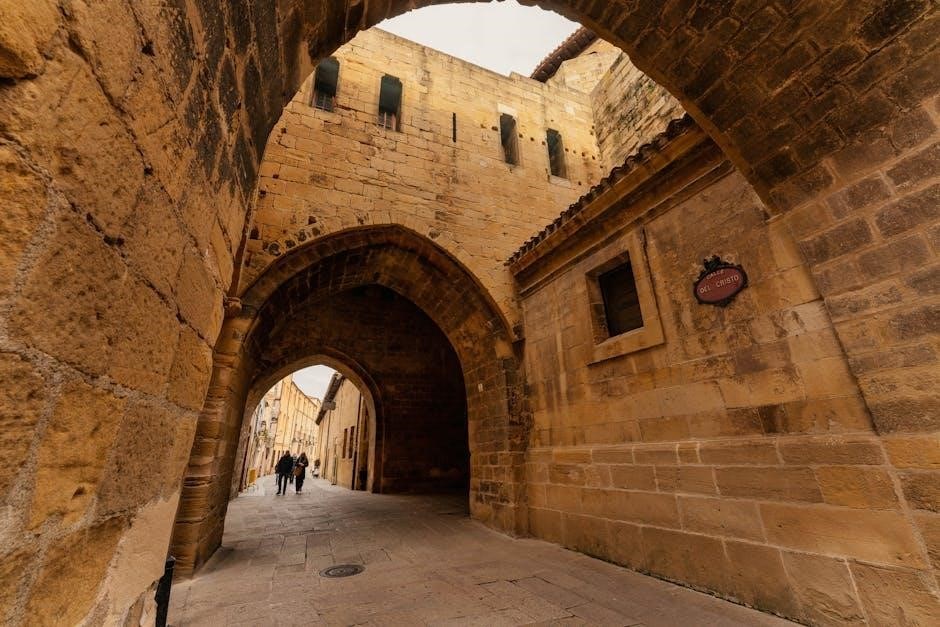
The San Juan Cathedral, or Catedral de San Juan, is one of the oldest cathedrals in the Americas, dating back to 1540․ Its stunning architecture blends Gothic and neoclassical styles, while its interior houses the marble tomb of Spanish colonizer Juan Ponce de León․ As a key stop on the walking tour, the cathedral is highlighted in the PDF map, guiding visitors to this sacred site․ Located on Calle del Cristo, it stands as a testament to the city’s rich history and spiritual heritage, offering a serene escape amidst the bustling streets of Old San Juan․
Museo de las Américas
Museo de las Américas is a cultural gem in Old San Juan, showcasing the history and heritage of the Americas․ Located in a historic building, the museum offers exhibits on pre-Columbian artifacts, colonial art, and African influences․ The PDF map highlights this must-visit attraction, making it easy to find during your walking tour․ Explore the diverse history of the region through its engaging displays and educational programs․ The museum’s central location on Calle del Cristo ensures it’s a convenient stop while exploring the city’s historic district․ Don’t miss this opportunity to delve into the rich cultural tapestry of the Americas․
Plaza de Armas
Plaza de Armas is the heart of Old San Juan, a historic square that has served as a social and political hub since 1521․ Surrounded by iconic buildings like the San Juan City Hall (Alcaldía) and the Casa de la Familia Puertorriqueña, the plaza is a testament to the city’s rich colonial past․ The square features a beautiful fountain and shaded areas, making it a perfect spot to relax and absorb the vibrant atmosphere․ The walking tour map PDF highlights this must-visit location, ensuring visitors can easily find and explore its significance․ Plaza de Armas is a focal point for both locals and tourists, offering a glimpse into the city’s enduring cultural heritage․
Historical Sites and Landmarks
Old San Juan is a treasure trove of historical sites and landmarks, reflecting its colonial past and strategic importance․ The walking tour map PDF highlights these iconic locations, making it easy to explore the city’s rich heritage and architectural marvels․
Fortaleza Street
Fortaleza Street is a vibrant and picturesque destination in Old San Juan, known for its colorful colonial-style buildings and lively atmosphere․ This historic street, once a military road, now thrives as a hub for shopping, dining, and cultural experiences․ The walking tour map PDF highlights Fortaleza Street as a must-visit, featuring landmarks like the iconic Casa Blanca Museum, once the residence of Juan Ponce de León․ Visitors can stroll along the cobblestone path, explore boutique shops, and enjoy local cuisine at charming cafes․ The street also showcases the city’s rich history, blending Spanish colonial architecture with modern Caribbean flair, making it a standout attraction on any walking tour․
San Juan Gate (La Puerta de San Juan)
The San Juan Gate, or La Puerta de San Juan, is the last remaining gate of the original six that once protected the walled city․ Built in 1635, it stands as a testament to Old San Juan’s rich history and defensive architecture․ This iconic landmark marks the entry to the historic district and offers stunning views of the San Juan Bay․ Visitors can walk through the gate, exploring its historic significance and admiring its sturdy stone construction․ The walking tour map PDF highlights this site, making it easy for travelers to locate and include it in their itinerary․ It’s a must-visit spot for history enthusiasts and photographers alike․
Cementerio de San María Magdalena
Cementerio de San María Magdalena is a historic cemetery located along the ancient city walls of Old San Juan, offering breathtaking views of the Atlantic Ocean․ Established in 1863, it is the final resting place of many notable Puerto Rican citizens, including politicians, artists, and military figures․ The cemetery’s ornate tombs and statues reflect the island’s rich cultural and historical heritage․ Visitors can explore this peaceful site while strolling along the Paseo del Morro․ The Old San Juan walking tour map PDF marks this location, making it easy for tourists to incorporate it into their self-guided itinerary․ It’s a poignant blend of history, art, and natural beauty․
Quadrilateral of Power (Cuartel de Ballajá)
The Cuartel de Ballajá, or “Quadrilateral of Power,” is a 19th-century military barracks and administrative center in Old San Juan․ This historic site is part of the San Juan National Historic Site and once served as the Spanish military’s headquarters․ Today, it houses the Museo de las Américas, which showcases Latin American art, history, and culture․ The building’s striking architecture and central location make it a must-visit attraction․ The Old San Juan walking tour map PDF highlights this site, allowing visitors to easily locate it near other landmarks like La Fortaleza and Castillo San Felipe del Morro․ It’s a testament to Puerto Rico’s rich colonial past․
Practical Information for Visitors
Plan your visit with the Old San Juan walking tour map PDF, featuring key attractions, transportation options, and dining spots․ Wear comfortable shoes and stay hydrated․
Best Time to Visit Old San Juan
The best time to visit Old San Juan is during the dry season, from December to April, when weather is cooler and less humid․ Summer months can be hot and rainy, while hurricane season (June to November) poses risks․ Plan your walking tour early in the morning or late afternoon to avoid midday heat․ Peak tourist season aligns with winter holidays, so expect larger crowds․ For a more relaxed experience, consider visiting during the shoulder season (April to May or September to November), when the weather is pleasant and attractions are less crowded․ Check local events and festivals, as they can enhance your visit but may also draw larger audiences․
What to Wear and Bring
Wear lightweight, breathable clothing and comfortable walking shoes suitable for cobblestone streets․ Bring a hat, sunglasses, and sunscreen for sun protection․ Insect repellent is recommended, especially during warmer months․ Stay hydrated with a reusable water bottle and carry a portable charger for your devices․ A small backpack or crossbody bag is ideal for essentials like a camera, snacks, and the walking tour map․ Lightweight rain gear is advisable, as brief showers can occur․ Dress modestly if planning to visit churches or museums․ Ensure you have a fully charged phone for navigation and photos․ Review the PDF map beforehand to identify must-see spots and plan your route efficiently․
Transportation Options
Old San Juan is easily explored on foot, making walking the most convenient option․ Taxis and rideshares like Uber and Lyft are widely available and can drop you off near key attractions․ Public transportation, including buses, provides an affordable way to reach the area․ If driving, limited parking is available in lots near the cruise piers and main plazas․ Scooter rentals are also a popular choice for shorter distances․ Cruise ship passengers can walk to Old San Juan from nearby ports․ Use the PDF map to plan your route and identify transportation hubs, ensuring a seamless experience during your walking tour․
Where to Eat and Drink
Old San Juan offers a variety of dining options, from traditional Puerto Rican cuisine to modern fusion restaurants․ Popular spots include Café El Punto for coffee and pastries, and La Mallorca for a hearty breakfast․ For a contemporary twist, try Marmalade Restaurant & Wine Bar․ The PDF map highlights recommended eateries near key attractions, ensuring you can easily find a place to rest and enjoy local flavors․ Be sure to check the map for hidden gems and local favorites, allowing you to savor the city’s culinary delights while exploring its historic streets․
Using the Old San Juan Walking Tour Map PDF
The Old San Juan Walking Tour Map PDF is an essential tool for navigating the city’s historic sites, offering detailed routes and key markers to enhance your exploration experience․
Downloading and Printing the Map
Downloading and printing the Old San Juan Walking Tour Map PDF is a straightforward process․ The map is available on various websites, such as Moon Puerto Rico and Puerto Rico Day Trips, ensuring easy access for planning your visit․ Once downloaded, print the map on standard paper or cardstock for durability․ The PDF format allows you to zoom in on specific areas, making it easy to navigate․ For the best experience, print in color to clearly see landmarks and routes․ You can also save the map on your mobile device for a digital guide; This ensures you have all the information you need to explore Old San Juan seamlessly, whether on paper or screen․
Navigating the Map
The Old San Juan Walking Tour Map PDF is designed to be user-friendly, with clear symbols and markers indicating key attractions, routes, and landmarks․ The map features a legend that explains the meaning of each icon, ensuring easy identification of historical sites, restaurants, and important locations․ Street names and numbers are prominently displayed, making it simple to follow the suggested walking routes․ The map is divided into sections, with color-coded paths for different tour routes, such as historic forts and cultural sites․ By referencing the map’s scale and grid, visitors can gauge distances and plan their itinerary effectively․ Whether using a printed copy or a digital version on your mobile device, the map provides a seamless way to explore Old San Juan’s treasures․
Key Symbols and Markers
The Old San Juan Walking Tour Map PDF uses distinct symbols and markers to highlight important locations and routes․ Icons such as stars, circles, and flags denote attractions like museums, churches, and historic sites․ Restaurants, cafes, and restrooms are marked with specific symbols for quick identification․ The map also features numbered waypoints that correspond to points of interest, helping users follow the tour seamlessly․ Color-coded routes distinguish between different walking paths, such as historical sites, cultural landmarks, and scenic coastal walks․ A legend is included to explain each symbol, ensuring users can easily interpret the map and plan their itinerary effectively․

Self-Guided Walking Tour Routes
Explore Old San Juan through three self-guided routes: historic forts, cultural sites, and scenic coastal walks, each offering unique perspectives on the city’s rich heritage․
Route 1: Historic Forts and Walls
Begin your journey at Castillo San Felipe del Morro, a 16th-century fortress offering breathtaking ocean views․ Follow the PDF map to the ancient city walls, which once protected San Juan from invaders․ Walk along the Paseo del Morro, a scenic waterfront promenade lined with historic sites․ Stop at the San Juan Gate, the last remaining gate of the original city walls․ This route highlights the military and architectural legacy of Old San Juan, providing a glimpse into its colonial past․ Use the map to navigate seamlessly between these iconic landmarks and uncover the stories behind their construction and significance․
Route 2: Museums and Cultural Sites
Delve into the cultural richness of Old San Juan on this route, which focuses on its museums and historical landmarks․ Begin at the Museo de las Américas, exploring exhibits on Caribbean and European influences․ Use the PDF map to navigate to the San Juan Cathedral, a stunning example of Spanish colonial architecture․ Continue to the Cuartel de Ballajá, home to the Museum of the Americas, offering insights into the region’s history․ The map guides you through these cultural gems, ensuring you don’t miss iconic sites like the Casa Blanca Museum․ This route is perfect for history enthusiasts and those seeking to understand the city’s cultural heritage․
Route 3: Scenic Coastal Walks
Embark on a picturesque journey along Old San Juan’s coastline with Route 3, designed to highlight the city’s stunning natural beauty and historic waterfront․ Begin at Paseo de la Princesa, a charming promenade perfect for a leisurely stroll․ Follow the PDF map to the San Juan Gate, where you can admire the ocean views and historic architecture․ Continue along the coastal path, passing by the Cementerio de San María Magdalena, a serene cemetery with breathtaking sea views․ The route concludes at Castillo San Felipe del Morro, offering panoramic vistas of the Atlantic Ocean․ This path is ideal for those seeking a peaceful, visually stunning experience․

Additional Tips for Exploring Old San Juan
Explore responsibly, respect historical sites, and stay safe by following local guidelines․ Engage with the vibrant culture and enjoy the unique experiences Old San Juan offers․
Respecting Historical Sites
Respecting historical sites is crucial when exploring Old San Juan․ Many landmarks, such as Castillo San Felipe del Morro and the San Juan Gate, are centuries-old and culturally significant․ Visitors should avoid touching or damaging structures, refrain from littering, and stay on designated paths․ Follow guidelines provided by site staff or signage to ensure preservation․ Be mindful of other visitors and keep noise levels reasonable․ Using the PDF map, plan your route to avoid overcrowding and wear on sensitive areas․ By preserving these sites, you help maintain their beauty and historical integrity for future generations to enjoy․ Respectful tourism ensures a positive experience for everyone․
Staying Safe
Staying safe while exploring Old San Juan is essential for an enjoyable experience․ Stay hydrated by carrying water, as walking in tropical heat can be exhausting․ Wear sunscreen and a hat to protect yourself from the sun․ Use the PDF map to navigate safely and avoid getting lost․ Be mindful of uneven cobblestone streets and watch your step․ Keep valuables secure and avoid displaying large amounts of cash or jewelry․ Stay aware of your surroundings, especially in crowded areas․ Follow local guidelines and instructions from site staff․ By taking these precautions, you can ensure a safe and memorable journey through Old San Juan’s historic streets․ Always plan ahead and stay informed․
Engaging with Local Culture
Immersing yourself in Old San Juan’s vibrant culture enhances your walking tour experience․ Take time to visit local cafes and try traditional Puerto Rican cuisine, such as mofongo or empanadas․ Engage with friendly residents, who are eager to share stories and recommendations․ Attend local festivals or live music events if your visit coincides with one․ Respectfully explore historical sites and museums to deepen your understanding of the city’s heritage․ The PDF map highlights cultural hotspots, making it easier to discover hidden gems․ By embracing the local way of life, you’ll create lasting memories of your time in Old San Juan․
Your Old San Juan walking tour is a memorable journey through history, culture, and stunning landscapes․ With the PDF map as your guide, you’ll discover iconic sites, hidden gems, and the vibrant spirit of this enchanting city․ Each step reveals a new story, making your adventure unforgettable․
Final Thoughts on the Walking Tour
Embarking on an Old San Juan walking tour is an unforgettable experience, offering a blend of history, architecture, and natural beauty․ Using a PDF map ensures you don’t miss any iconic sites like Castillo San Felipe del Morro or the vibrant Paseo de la Princesa․ The self-guided route allows flexibility, letting you soak in the city’s ambiance at your own pace․ Each landmark tells a story, from the ancient fortifications to the lively plazas, making the tour a perfect way to connect with Puerto Rico’s rich heritage․ The detailed map is your key to unlocking the secrets of this captivating city․
Encouragement to Explore Further

Exploring Old San Juan is a journey through centuries of history, vibrant culture, and breathtaking scenery․ With a PDF map as your guide, you’re empowered to venture beyond the main attractions and uncover hidden gems․ Take your time to wander through cobblestone streets, admire colonial architecture, and engage with local artisans․ Each corner offers a new discovery, from quaint cafes to stunning ocean views․ The city’s compact size makes it easy to explore at your own pace, ensuring a memorable and enriching experience․ Let the map lead you to unexpected delights, and embrace the opportunity to fully immerse yourself in the beauty and charm of Old San Juan․